
Normally I don't let much get in the way of a creative spark.When I get an idea, I go for it. And I've had a great idea since last week, but one big giant thing was in the way.
Who knows how many thousands of pounds of masonry rock for the face of our house was right in the way of my next DIY project. That, and taxes.
Well, taxes, kids, dinner, husbands, housekeeping AND this gigantic pile of concrete.
What to do?Well, I could ask the RAM (Real Alaska Man) to move the concrete. But that's just not right. And even I, the firm believer in natural exercise, thought this might be a little much for me and Grace to handle. I tried - I couldn't even lift one box.
So I waited.I waited until Wednesday, when the delivery truck comes with our organic produce, our groceries for the week.
There's our groceries for the week, delivered right to our doorstep! Oh, the things I can do with a moose in the freezer and this box of produce! And no, I didn't bum the pallet jack off the driver.

And although I was very thankful, it did not have as much character as the one's under the masonry rock
See the blue and green on the bottom pallet? Yes, these pallets will get put to good use after the masonry rock is put to good use. And I wasn't complaining about my absolutely free pallet. After all, when someone gives you something, you shouldn't complain. You shouldn't immediately chop it up either, with a 1 and 3 year old watching. I at least waited for the truck to leave the yard.
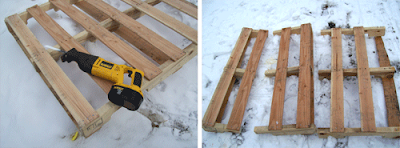
Do they make safety glasses for infants?Sawsall. Yes, the tool is not creatively named, but very effective. A handsaw would have been just as effective, but I didn't have the time. Not with my two helpers standing in the snow holding their ears.

 Then we went in the garage and took a quick measurement of the openings on the bottom of the pieces I had chopped up. Roughly 18". And I knew the sides were 2x4s, so I grabbed some scrap 1x4s and cut four pieces at about 18".
Then I grabbed my nailerand put some 1 1/4" nails into the edges to form a bottom on the pallet pieces. I also nailed down a few loose pieces from the pallet. And then I brought the pieces inside and plopped them down on the floating shelf from yesterday (my husband has asked me not to poke any more holes in the wall just for fun).


No, I actually made myself TWO free reclaimed wood shelves, in about five minutes (for both shelves) out of reclaimed wood with a 1 year old and a 3 year old watching, in the snow.
And when my husband came home, I got the ultimate compliment . . . "Whoa, where'd you get those?"
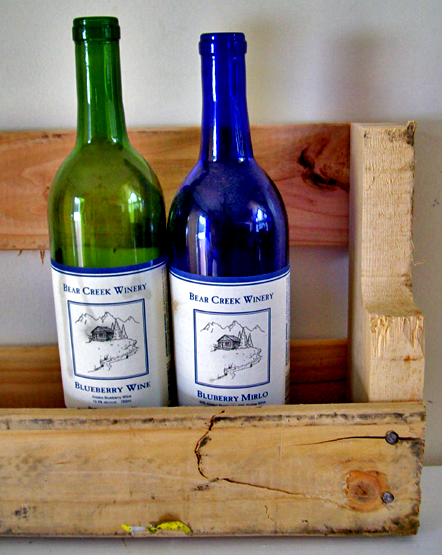
It took longer for me to explain the whole story to him than it did to actually build (can I use the word build here?) these shelves. Of all the projects I have completed over all the years, this one, these simple shelves, was by far the most dramatic results for the time investment and the money investment. And this project is very useful, think about kid's books, bathrooms, spices, even my wine bottles and ballet flats could fit in there! And this project is green - it's made from reclaimed wood and takes someone's trash and turns it into a treasure. Or at least a beautiful place to hold your treasures.
Reclaimed Wood Pallet Shelves. Hand selected and hand cut, each shelf is unique and bears the character of years of use as a shipping pallet. No two shelves are the same, and may have shipping markings, unique discolorations, or non structural cracks, all telling a story of mysterious travels and precious shipments. All shelves have authentic original nails, and are FSC certified.
Skilled artisans hand cut each shelf from a pallet. Sold unfinished, your shelf will continue to develop in character over time. $329. Some Assembly Required.
And yes, this shelf has character. Lots of character. I love the stamp on the end, the cracked board on the front, the rough cut notch out, the authentic nails, these are the details that could be very expensive if bought. But you are smarter than that. You are not going to buy what you could build for free.

1. Reclaiming Wood.Score a pallet, the more character the better.
2. Cutting the Pallet. Cut the pallet up on the supports, you should be able to get at least two shelves out of one standard pallet. If you have to transport the pallet, you could cut it before hauling, getting it to fit into just about any station wagon.
3. Cutting the Bottom. Measure the length of the opening on the bottom of the pallet and cut a 1x4 board to fit in the opening. For a standard pallet, this measurement should be about 18". You will need 2.
4. Bottom. Fasten the 1x4 boards to the bottoms of the shelves, I used nails, but you could use screws.
5. Hanging.Either attach a picture frame hanging kit to the back and hang as you would a picture frame, or screw through one of the back boards directly into a stud in your wall to hang.
And of course, you could paint or stain as desired. And I want your photos, how you used your free Reclaimed Wood Pallet Shelves.
